,

Showing posts with label tutorials. Show all posts

Sunday, November 4, 2012

How to get plump lower lashes with this simple trick

Pin It Now!

If you’re like me, with almost non-existent lashes, even mascaras that claim to be lengthening and volumising just don’t really seem to make a difference. False lashes are a life saver, but some days it’s just way too much effort. Don’t give up on plump and dramatic lower lashes just yet. Here’s how I create plump lower lashes without false lashes.

IMG_8806

You will need:

  • A fibre mascara(lengthening or volumising)
  • Sheer face powder
  • Small makeup brush

Step 1: Start with a clean base. Make sure your lashes are clean and dry.

Step 2: Using a fibre mascara (I recommend Kiss Me Heroine Make Long and Curl Mascara), apply one coat on lashes. Make sure you apply mascara to every lash, especially the thin ones on the inner and outer corner of the eye.

Step 3: Before the first coat of mascara dries, load a small makeup brush with sheer powder and tap off the excess. Apply powder over the still wet mascara until the powder completely coats the lashes.

IMG_0718IMG_0720

Step 4: Apply another coat of mascara over the powder.

IMG_0701

Repeat as many times as desired. The more you repeat the process the plumper your lashes will become, but don’t over do it, as they will start looking too clumpy. IMG_0754

What are your lash plumping tricks?

Tuesday, August 14, 2012

How to: DIY flower crown

Pin It Now!

Ever since I saw that awesome flower crown on Lana Del Rey, I’ve been spending most nights making them, much like an 18th century Jane Austin style unmarried old maid. For me, the flower crown has got to be big, too big for your head, big.

flowercrown

I won’t be showing you how I did the crown I’m wearing, as it’s hard to get the flowers I used for it, but the technique is basically the same!

First, source some big artificial flowers. I’ve shopped around for good prices on artificial flowers and found them to be surprisingly pricy. You can buy bulk flowers on ebay for something like $10 for 20 flower heads. But then I visited the local dollar store, and found these bouquets for $2.50 each! I usually use at least two different types of flowers to make the flower crown look more interesting.

93

You don’t want the stalk, so the first thing we’re going to do is remove all the flowers.

94

95

To assemble the crown, you’ll need some flower arranging wire and tape. You can get these at any craft store. You can use any kind of wire or tape, but it works best if they are green. Also make sure you have a pair of pliers.

126

Make the base to connect the flowers to with two or three of the flower arranging wire, depending on how big you’re making the crown.

102

Using your head as a guide for the size, twist the wires together to form a ring. As we are making a big and full crown, make the base as small as you can, just big enough to sit on top of your head.

103

Next we’re going to make the stalks to mount the flowers. Using wire cutters or strong scissors, cut the wires into fours.

9697

However, as the wires are too thin for the flower heads, bend over one end, flattening it as much as you can with pliers. Then insert the bent side into the tube at the bottom of the flower. Bend up any wire left showing underneath, and out of the way. For good measure, you can use a glue gun to glue the stalk firmly onto the flower.

99100101

Now we’re going to attach the flower to the crown. Hold the flower in place, then, using pliers, tightly wind the stalk of the flower around the crown.

104_2

With the next flower, places it as close to the first flower as you can and then wind the stalk like the first. To make it easy to work with, always wind the wire in the same direction.

127

Rinse and repeat until you have a complete crown!

128

Have fun!!

Tuesday, July 31, 2012

Monday Nail Stuff: Pastel manicure!

Pin It Now!

304

Today’s nail look is inspired by pastel jewellery. I love the trend right now of mixing pastel with gold. Fashion accessory chain Lovisa does this style extremely well. I don’t quite understand why pastel and skulls work so well together…probably one of those mysteries of the universe!

pastel

This look is extremely easy to do. The only problem may be to give sufficient time for the layers to dry.

You’ll need:

  • Base coat: I’m  using OPI Base Coat
  • Pastel base colour: I’m using a slightly minty grey, Essie “Da Bush”
  • Gold tip colour: I don’t own a foily gold, so I’m using China Glaze “Cowardly Lyin’”, applied in several layers
  • Top coat: I’m using Seche Vite Fast Dry Top Coat

298301303

After applying the top coat, apply the pastel base colour. If it’s a light colour, you’ll need at least two coats. If you are applying multiple coats, make sure to let this dry completely before applying the tip colour.

302

It might look tricky to paint the tip, but it couldn’t be easier! The key is to paint in quick strokes without going over it too much. If you mess up, you can always fix the mistake with some base colour.

pastel01

Have fun creating your pastel manicure!

Thursday, May 3, 2012

Storing your false lashes!

Pin It Now!

Great eyelashes are expensive, so we all want to keep and reuse them for as long as possible. The challenge with that is, of course, a way to store these delicate little things so that they are kept pristine and easy to use, and most of all, doesn’t cost you the same as you pair for the lashes themselves. As a total false eyelash addict, I have lost count of how many designs I have at any time, and have tried all sorts of different ways of storing them. So this Cheap Thrills Thursday, I thought I might share with you guys what’s cheap and chic solution has worked for me.

So what if you just kept your eyelashes in the case they kept in? Well just a few of the problems I can name with this strategy is the tediousness of sticking the lashes back onto the mounts, the fact that the original packaging takes up so much space, and that it’s difficult to store packaging in a way that they are easy to find.

89

So the next thing you might have tried is one of those single or split compartment purpose made eyelash cases, like the popular Dolly Wink eyelash case. This would be great if you have just one or two sets of lashes. In fact the Dolly Wink case is designed with one big compartment for strip top lashes, and one small compartment for individual lower lashes. But guess what happens when you try to put a few sets of lashes in the same compartment together.


eye-lash-caseeye-lash-case2

Yup. One black clump of indistinguishable fur.
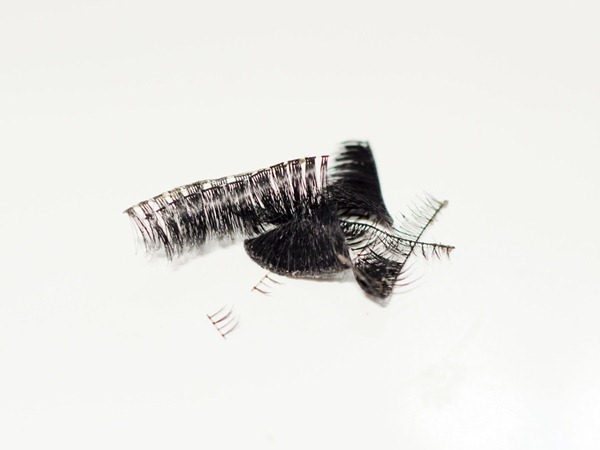
 

90

The most challenging thing about storing lashes this way is that tiny lower lashes stick to the strip lashes, and once stuck together, it’s almost impossible to find them again! Of course, you could get multiple eyelash cases, and separate your lashes out that way, but then, unless you label each one of your eyelash cases, you’ll be opening each box to find the lashes you want on any particular day. And the other problem? Price. Dedicated eyelash cases like this super kawaii Dolly Wink one can set you back up to $7!

My solution?

Clear nail art storage boxes! 91

These are generally designed and sold for storing acrylic nail tips, rhinestones etc. But it just so happens that a particular design for these cases is the perfect size for storing false eyelashes. When I was looking for one of these cases online, I looked at the measurements of the compartments and found that these were the perfect dimensions for extra long Asian lashes like Dolly Wink.

With this 10 compartment case, you can store 10 pairs of strip top lashes or individual lower lashes in individual compartments. The dividers fit snuggly into the lid (as it’s designed to keep tiny bits) so there is no risk of your tiny individual lashes falling into the other compartments when the case is shaken. It also comes with one big compartment you can fit in extra long strip lashes, or store your essential tools.

The case is clear, so you can immediately see what’s stored inside. So you could have any number of these and would always be able to find the eyelash you want.

The best part? You can buy one of these cases for as little as $0.99 on ebay!!

It’s funny, but my friend once asked me how I can tell which eyelash is which when I’ve already thrown away the packaging. But I think you would agree with me, when you really love false eyelashes, you can tell! For example, my current case is holding, from left to right, Dolly Wink No.7, Dolly Wink No.6,Dolly Wink No.14, Dolly Wink No.8, Melliesh No.1, Dolly Wink No.1, Dolly Wink No. 10, Dolly Wink No.3, Diamond Lash Angel Eye…wow I have a lot of Dolly Wink lashes!!

How many pairs of false eyelashes do you own, and how do you store them?

Wednesday, March 21, 2012

How I did my rainbow manicure

Pin It Now!

After I posted about my rainbow manicure two Monday Nail Stuff posts ago, lots of people asked me how I managed to get the stripes so straight. I was trying to impress on everyone how easy it was, but I don’t think I got the message across, so I thought I might do a short tutorial post. I’m hoping to convince you nonbelivers who think you have no time for nail art, that it can be quick and easy, and you’ll be delighted with the results!

IMG_8866

So first, the tools. You’ll need 6 colours, purple, blue, green, yellow, orange, and red. Any shade will do, as long as they are bright. I used:

  • OPI Pamploma Purple (In my original rainbow manicure post I used Essie Tri-Becca)
  • OPI “Suzi Says Fung Shui”
  • China Glaze “Jolly Holly”
  • China Glaze “Happy go lucky”
  • OPI “Hot & Spicy”
  • OPI “Red my fortune cookie”

First, paint your nail with the purple as a base as normal, making sure that the base is neat and clean. Wait for this layer to mostly dry before going on to the next step.

27

Now, paint the first blue strive, holding the brush HORIZONTALLY. Draw the brush in one smooth motion from left to right (or the other way if you are left handed). Make sure it’s one quick stroke, so that the edges of the stripe is as straight as possible. It might also help to turn you finger as you go to help guide the brush.

28

Give the blue stripe a few seconds to dry a little, then apply the green, overlapping the blue stripe.

29

Rinse and repeat!

30

See – so easy!!


Happy nail rainbow nail art-ing guys!

Tuesday, February 28, 2012

Ulzzang inspired makeup tutorial!

Pin It Now!

A while ago one of my readers asked me if I would do a Korean Ulzzang makeup tutorial. Well here it is! There is a huge difference between Japanese gyaru style makeup and the Korean Ulzzang look. The main difference is I think the gyaru style is aimed at achieving huge round lashy eyes, while the ulzzang style is about creating a half moon eye shape and elongating the eye while keeping everything quite natural looking. The appeal of Japanese gyaru style is that you use so many products and tricks to camouflage almost any flaw. For example, if you have narrow eyes, you can make them look wider by applying super long lashes; if you want your eyes to look droopy all you have to do is draw eyeliner outside of your natural eye line. As the Ulzzang look requires (and allows for) so much less makeup, the key is to emphasize your naturally beautiful features, particularly your eyes. So most of the steps in the below tutorial will be aimed at doing this – good luck!

IMG_8206_2

First, start with a flawless base. I used Garnier Miracle Skin Perfector BB Cream as a base, Chanel VITALUMIÈRE AQUA Liquid Foundation, Clinique Concealer, and Chanel ÉCLAT LUMIÈRE for under the eyes. Pay special attention to concealing any blemishes and under eyes shadows. Apply a generous amount of foundation to completely even out your skin tone. It might not be a bad idea to use a shade lighter than your skin, but make sure to follow through with your neck and décolletage so there is no contrast!

Now apply a little blush to give your skin some colour to balance out all that foundation!

78

One of the most iconic aspects of the Korean Ulzzang look is thick and straight, natural looking eyebrows. Use an eyebrow pen to fill in any gaps and draw slightly outside of your eyebrows if they are very thin. I have also used Cosmagic Visual Up Brow eyebrow mascara to lighten my eyebrows.

6

Now eyeshadow. I used a four tone palette by Stilla, my favourite!

9

Use the highlight to brighten up your whole eye area.

10

Using mid-tone and the brown shadows, define your lids and shade the outer corners of your eyes.

11

Now to create that puffy tear line look. Apply a thin line of highlight (or white eyeliner) just below your tear line, then just below that, a thin like of mid-tone eyeshadow.

14_2

Now for the all important eyeliner. I used Dolly Wink Liquid Eyeliner in Black. Draw a thin line as close to the roots of your lashes as you can, then draw out a *really* long wing. Make sure this line is super smooth and close, and also apply eyeliner under the roots of your top lashes.

15

Now we’ll work on the bottom eyelid to complete the half moon shape.

Using liquid eyeliner, draw a thin line under the tear duct of the inner corner of your eye.

16

Using a near-black eye shadow or pencil eyeliner, draw out the outer edge of your eye, making sure to meet up with the wing of the liquid eyeliner on top.

17

If you already have long lashes, just curl them, and apply a thick layer of mascara. If you have almost non-existent lashes, like me, apply a set of natural long lashes, like this pair I purchased for $2.80 from the local discount store. This kind of design should be quite common and easy to find.

19

18

Apply a natural pink lippy and you’re done! (Yes, I changed lenses – I thought a natural brown like Princess Mimi Bambi Almond Brown would be more appropriate!)

IMG_8201_2

Oh, and don’t forget to enter my giveaway!

favouritesgiveaway[4]

Enter now!

Comment with Facebook!